By Geetesh Bajaj, James Gordon. When arranging content on slides, you can toggle several alignment features on and off in PowerPoint 2011 for Mac. These features are designed to help you place objects in alignment with each other or to an invisible grid on a slide.
Use this function to move an object exactly to a grid point (see Figure 6). This function can be switched on and off with View > Grid > Snap to Grid and on the Options toolbar with the icon. Showing the grid Make the grid visible under View > Grid > Display Grid. Alternatively turn the grid on and off with the icon on the Options toolbar. Figure 6: Exact positioning with the snap to grid function.
Changing the color of the grid points By default the grid points are bright gray and not too easy to see. Under Tools > Options > OpenOffice.org > Appearance in the section Drawing / Presentation the color of the grid points can be changed (see Figure 7). On the Color Settings pulldown menu select a more suitable/visible color, for example black. Figure 8: Configuring the grid. No adjustment is necessary in the Grid field, for these settings can be changed directly from the icons on the Options toolbar.
Resolution: sets the horizontal and vertical distance between two grid points (see Figure 9). Figure 9: Grids with different resolutions. Subdivisions: determines how many steps there are between adjacent grid points. Intermediate steps make it possible to have a larger separation between 2 grid points and so the drawing remains clearer (see Figure 10). Objects can snap to intermediate points in exactly the same way as grid points.  Figure 10: Grid with intermediate steps (subdivisions).
The other settings are largely self-explanatory. One important setting is the field Snap range. Grid points and guiding lines are both optical help elements which are managed separately by Draw. If you have activated a snap function and then move an object, Draw looks in the vicinity of the position of the object for those special help elements.
This determines the final position of the object, and with the snap range setting you can determine the extent of this search ‘area’. Exactly how large the snap area is depends on the current environment – which particular snap functions are in use, how the grid is configured and whether or not there may be collisions with other objects. It is usually necessary to do a little experimenting to find what best suits your needs.
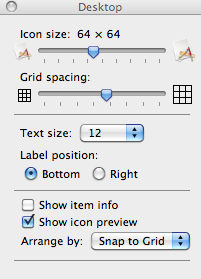
I don't like how in Finder, you can drag a folder and drop it anywhere, even overlapping on another folder. For example: That is just annoying. And when I resize the window, the files stay how they were (like the files don't reorganize to fit in the new size of the window). I do realize I can right click and select 'Clean up', but I don't like having to do that every time I drag and drop a folder/file. I know about the setting to make everything 'snap to grid' so it will stay organized in the 'Show View Options': However, it only works for that specific folder and does not work across the whole Finder like I want it to. Is there any way to make it apply across everything in Finder? Also I tried clicking 'Use as Defaults' but that only applies to newer folders created I think.

The following steps applied 'Snap to Grid' even for previously created folders. Best free video chat app for mac. Tested on: • 10.6.x • 10.7.3 • 10.8.x • 10.9.x • 10.12.5 • Go to any folder control • Control click on the empty space • Click on Show View Options • In the 'Sort by' drop down bar select ' Snap to Grid' • At the bottom of the window click on the 'Use as Defaults' button NOTE: Because this will become the default setup for ALL Finder windows you may consider manipulating the Icon size, Grid spacing, Text size, Label position, Background, etc. ALSO: If folders do not appear to have snapped to grid on a previously created folder, Relaunch Finder or you could try to toggle the 'Icon size' down and back up too refresh the current window.