This question already has an answer here: • 2 answers My hard drive in my Macbook completely broke a few weeks ago (didn't have much on it thankfully), so I bought a new hard drive and replaced the old one. Now I'm not too sure how to set this new hard drive up (as in putting an OS on it and formatting it correctly) - I'm not concerned with getting any of my old data back on it, I just want to set it up as a new Macbook. Similar questions I have found all seem to ask how to set it up with all the old data. How do I boot the system up (safe boot, recovery etc.)? And what do I need to do once it's booted up? Any help is much appreciated.
How to Format a Hard Drive For Both Windows and Mac. Your exFAT-formatted drive or partition can now be used for both Windows and Mac. Note that using a drive frequently between Windows. SSD how to re format from mac osx journaled to be able to use in windows. If you have a running Windows machine that you can install the SSD in, I would do that and run Samsung's Magician.
Office 365 for mac outlook unread folder. I'm out of ideas.
This answer is more tailored to your question. • Install the new HDD. • Boot to Internet Recovery.
Startup your Mac and immediately hold down the option+ ⌘+ R key combination. • Release the keys when the Apple logo or a spinning globe appears • Use the Disk Utility application to erase the HDD.
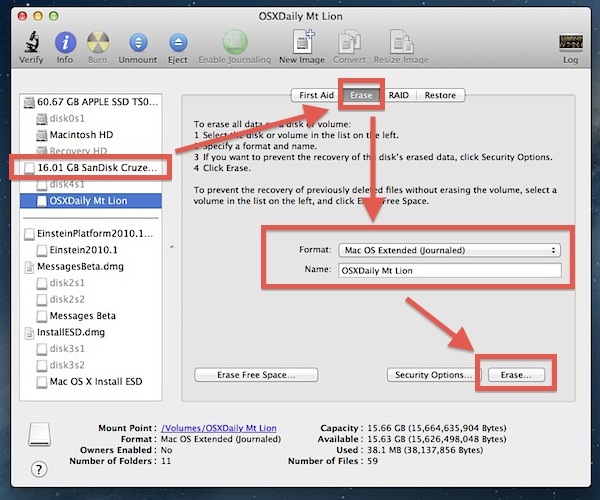
When prompted, select the 'Mac OS Extended (Journaled)' format. You will also have the option to select 'APFS'. Some notes about APFS is given below. • The Apple File System (APFS) was introduced with High Sierra. • Many users have reported problems repartitioning their drives when APFS is in use. • Many users have report difficulties using the Boot Camp Assistant to install Windows when the APFS format is used. • You can convert to APFS later, if you wish.
• Install macOS. • Restart to the newly installed macOS. Below is a more generic answer. • Install the new drive.
• Boot to Internet Recovery. Startup your Mac and immediately hold down the option+ ⌘+ R key combination. • Release the keys when the Apple logo or a spinning globe appears • Open a Terminal window and enter the following commands. Diskutil unmountdisk disk0 diskutil eraseDisk free none disk0 Note: Normally you should not have to use the diskutil commands to erase the drive. Occasionally, step 5 fails, if step 4 is skipped. If you feel lucky, you can try omitting this step.
• Use the Disk Utility application to erase the drive. When prompted, select the 'Mac OS Extended (Journaled)' format. If you desire encryption, then select 'Mac OS Extended (Journaled, Encrypted)' format instead. • Install macOS. Note: If you are installing High Sierra (macOS 10.13.x) to a SSD, this drive will probably be converted use the APFS format.
• Restart to the newly installed macOS. • If the installed macOS is not the current macOS, then download and install the current macOS from the Apps Store.
In order to install the operating system you'll need to boot into Internet Recovery by holding down Command + Option/Alt + R. You will need a decent internet connection and a power supply for the duration of this process. From here you can select your language, then use Disk Utility to Erase the new internal drive. After you've Erased the drive you can close Disk Utility and follow the instructions to Install macOS. It is likely you'll be given an older installation of macOS and need to immediately do various system updates.

How to install a Crucial SSD in a Mac® computer If this is your first time installing a Crucial SSD in your Mac system, there’s no need to fear – the process is easy and straightforward. It’ll take some time, but your computer will be radically faster when you’re done! Before you begin, use our to verify that the SSD you purchased is compatible with your computer, as not all Mac systems are upgradeable. Once you’ve done that, you’re ready to get started. Part 1: Prepare • 1. Gather supplies You’ll need your Crucial SSD, a screwdriver, your Mac system’s owner’s manual (which will specify the type of screwdriver you need), and a (sold separately).
• For redemption, please produce original warranty card and receipt at Canon Customer Care Centre (CCCC): 1 Fusionopolis Place #02-20 Galaxis (West Lobby) Singapore 138522. • Applicable to purchases from Canon Singapore Authorised Dealers only. • Dealers are not allowed to claim on behalf of customers. Business High Grade Paper High grade white paper for general office use. • Images of free gifts for illustrations purposes only; actual product may differ. Driver canon pixma ip2770 for mac.